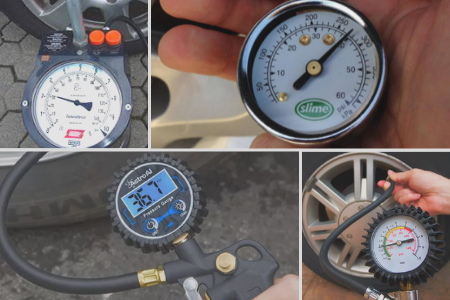
Checking the tire pressure with a gauge rather than eyeballing it will give you a more accurate result. And it’s easy to know whether the tire is under-inflated or over-inflated using a little pressure gauge. But why to check the pressure in tires?
This is because both overinflation and underinflation have negative consequences on your drive. The underinflation leads to a poor gas mileage and extra wear and tear whereas overinflation causes discomfort and accidents.
Therefore, maintaining the correct inflation is essential to make your vehicles perform the best. Not only does a properly inflated tire save you money and gas, but gives you a smooth ride. Here is how to check tire pressure at the gas station.
Materials you will need to check tire pressure at the gas station.
01. Tire pressure gauge

The first thing you need to have on hand to check the tire pressure is a gauge. There are mainly three types of pressure gauge you will find on the market. They are stick, dial, and digital and available at any auto parts store. Of the three models, the digital gauges are highly recommended as they can provide the accurate value. Unfortunately, most gas stations use conventional tire pressure gauge, I mean either the dial or stick type, which often misleads. If you find something wrong and get confused, you can ask the service staff for help.
02. Owner’s manual
The next thing you need to check the tire pressure is the user manual, where you will find the recommended tire pressure. If you don’t know the standard PSI recommended by the tire manufacturer, you cannot understand how much the tire should be inflated to. In case you forget to bring the manual, look at the door jamb on the driver's side to find out the PSI specified by the manufacturer.
03. Service station or gas station with an air hose
If the tire pressure is low, find out the gas station nearby. Every station has the air machine or tire inflator which is usually kept outside of the station and looks like a small box with long hoses attached to it. Most hoses come in with a built-in pressure gauge on the top which shows you the present PSI level.
Tips
Check the tire pressure when the tires are cold. Morning is the best time to check the tire pressure. If you have been on a long drive, wait for a few hours to let the tires cool down. Checking after long drive will give you inaccurate pressure because heat expands the pressure in the tire for a while.
Steps to follow while checking air pressure in tires at gas station
Step 1:
Go to the gas station and place your car closed to the inflator so that the hose can reach all of the tires to be inflated.
Step 2:
Remove the air cap from the tire valve stem and keep it into your pocket or in a safe place so that you don’t lose it.
Step 3:
Place the pressure gauge into the air valve stem firmly and press down until you listen to a hissing sound. Then the reading shown by the gauge will indicate the present pressure level of the tire. If the gauge is standard type, then it will show you a small bar pushed by the air pressure. The digital one will provide you the reading in number on the screen.
Step 4:
Compare the reading provided by the gauge with the recommended PSI by the manufacturer. Doing so will let you know how much pressure you need further to reach the standard pressure.
Step 5:
If you find the pressure low, add the air by pressing the air-hose tip down on the air valve stem of the tire and hold the trigger in until you reach the required level. And in the meantime, you need to read the gauge on the air hose if it has one. If it doesn’t have, release the air hose and check the pressure by using your gauge. This will let you know when you are closed to the right amount of air pressure.
Step 6:
If the pressure is a little over, don’t get worried. All that you need to reduce the pressure is to press the pen down inside the valve stem with the back of the air hose nozzle.
Step 7:
Recheck and repeat if still not the recommended amount.
Step 8:
Replace the stem cap and you are done.

Olivia Archer provides in-depth coverage of air compressors, air compressor accessories, tire inflators and all things related to air compressors. She is a mechanical engineer and air compressor expert with a wealth of knowledge and experience in the industry.
Olivia’s articles are informative, well-researched and provide readers with valuable insights and information to help them make informed decisions when purchasing air compressors and accessories. She is passionate about the industry and is always looking for new ways to share her knowledge and expertise with readers. When she’s not writing for the website, Olivia can be found working on her own DIY projects, experimenting with different tools and techniques, and expanding her knowledge of the industry.


